Description
What is this technique about
The sketching method is a technique used in the ideation or conceptual design phase of the creativity process to explore and generate new ideas quickly. It involves creating rough, low-fidelity sketches of concepts and ideas to communicate, visualize and evaluate them. Not only user interfaces of software applications can be sketched but also hardware solutions. The sketching method allows designers and creatives to quickly iterate and refine their ideas, test different solutions, and explore various possibilities before committing to a final design.
Overall, the sketching method is an effective way to jumpstart the creative process, explore new ideas, and visualize concepts quickly and easily.
Where does it come from
The sketching method has been used by designers and artists for centuries as a way to quickly capture and communicate their ideas visually. However, the modern use of the sketching method in the context of creativity and design is often attributed to the development of industrial design in the 20th century.
During the mid-20th century, the sketching method became even more important as new technologies such as 3D modeling and computer-aided design (CAD) were developed. While these tools offer many advantages, they can also be time-consuming and require a high degree of technical expertise. Sketching, on the other hand, remains a quick and intuitive way to generate ideas and explore new design possibilities.
Today, the sketching method is used by designers and creatives in a wide range of fields, from product design and architecture to graphic design and illustration. It has become an essential tool for anyone who needs to generate new ideas quickly and communicate them effectively.
For which purposes it is used (why in your engineering teaching)
Sketching is a powerful tool for creativity because it encourages free thinking and exploration, enabling creatives to break away from preconceived notions and explore new possibilities. Additionally, sketching allows for rapid ideation, which can help designers generate more ideas in a shorter amount of time. It can be used for individual or group work.
How to use it
Clearly articulate the problem you are trying to solve or the challenge you are trying to address. This will help you focus student’s ideation and ensure that their sketches are relevant and useful. Start by generating a large number of ideas, without worrying about whether they are good or not. Use brainstorming techniques or other ideation methods to come up with as many ideas as possible. Once you have a list of ideas, start sketching them out roughly. Use simple materials such as paper and pencil, markers, a whiteboard or their digital counterparts. Focus on the basic form, shape, and function of your ideas, rather than on details or refinement. Review your sketches and select the most promising ideas to develop further. Refine your sketches and add more detail as needed, while still keeping them low-fidelity and flexible. Iterate over the sketching and refinement process as many times as needed to arrive at a satisfactory solution. Use feedback from others, user testing, or other evaluation methods to guide your iterations.
The sketching method is all about exploration, iteration, and flexibility. Don’t worry about creating perfect or polished sketches; instead, focus on generating as many ideas as possible and refining them over time.
For more level of detail, high fidelity prototyping tools can be used. There for example such as Figma (https://www.figma.com), Adobe XD (https://helpx.adobe.com/support/xd.html) and Axure (https://www.axure.com) as the most popular ones.
How to implement this techniques online
- Prepare a digital whiteboard, they all over free-hand drawing.
- Split your class into groups of 6 – 8 participants.
- Articulate the problem you are trying to solve.
During application, i.e., while giving the session
- Introduce the exercise and its purpose.
- Let the students do a teamwork for around one hour.
- If students work individually, the also can do paper-and-pencil or physical sketches and upload photos to the whiteboard.
- For feedback and evaluation, let all teams present their sketches in the plenum within a maximum of 5 minutes.
Follow-up, about what to do after the session
- Wrap up the exercise.
- Store the sketches for further use.
- If you plan to prototype the sketches in more level of detail, you can use specific prototyping tools such as Figma (https://www.figma.com), Adobe XD (https://helpx.adobe.com/support/xd.html) or Axure (https://www.axure.com).
Examples and/or testimonials
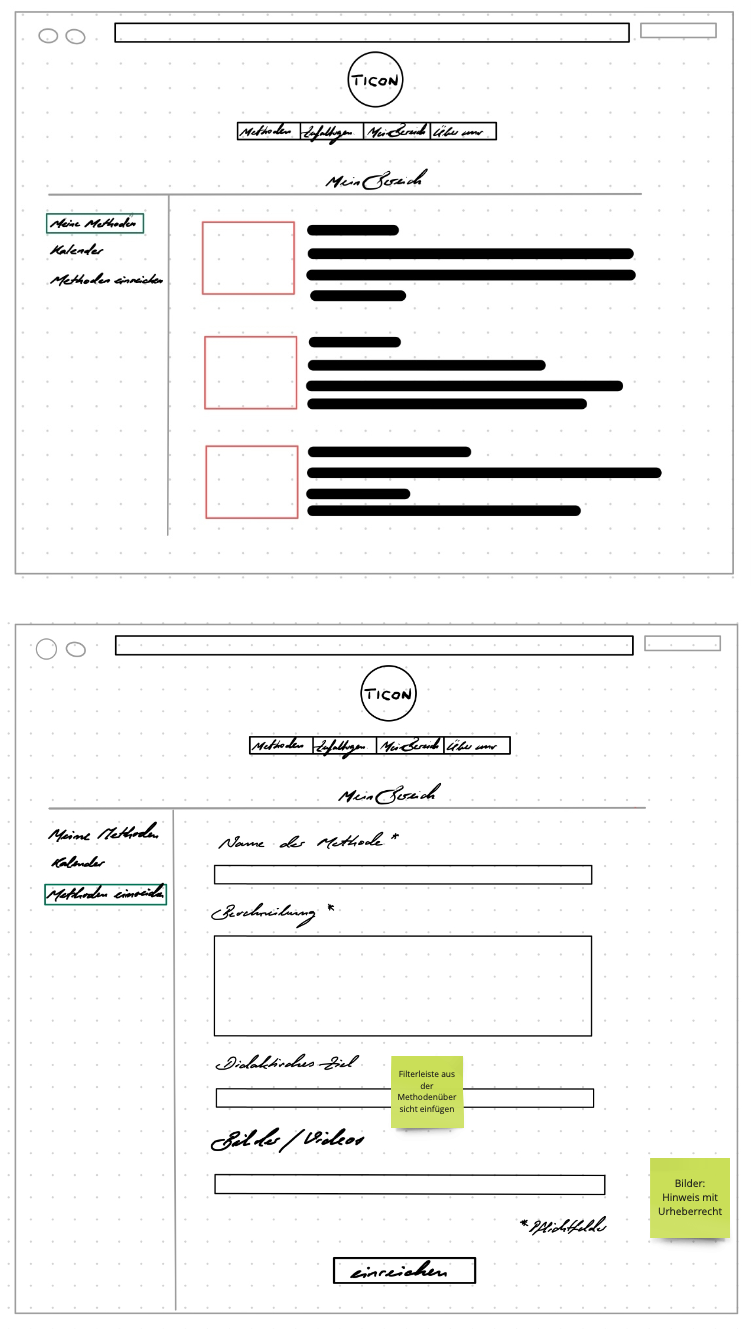
Below is an example from the course “User Experience Design” at Hochschule der Medien of Prof. Dr. Christoph Kunz. It shows very early ideas on how this TICON platform can be structured to show the method toolbox.
Tools needed
You will need a platform to share screens and communicate with the participants, such as: MS Teams, Zoom or similar. You will also need a white board solution with digital sticky notes such as Miro or Mural:
- Zoom
- MS Teams
- Miro
- Mural
- Timer (phone, watch, computer)
Resources
Videos
TCUX Innovation. (2021, Januar 12). How to do easy sketches at Miro? [Video]. YouTube. Available at: https://youtu.be/JyHhuUikdNQ